Pandemic Props!
Michael MacWolff
Well well, here we are again. To anyone who’s actually here seeing this, I’m delighted to have you back and also, it’s been a frankly embarrassingly long time since I’ve posted anything on here. I do plan to slowly add more to my cryptozoological field guide as I get new creatures assembled, but it will definitely no longer be a weekly endeavor; I do plan to keep to the Monday postings though so things will at least be consistent and mesh with my Instagram. In the meantime, however, I’m going to try to breathe at least some life back into my site here, which has gone untended long enough to probably be considered an archaeology project that this point lmao.
I hope all of you out there have been staying safe and healthy as the pandemic drags on. Blessedly Jordan and I have managed to avoid Covid thus far, and are very thankful that no one in our families has had any major complications with it.
Obviously with all that’s been going on, I haven’t been to any cons for the last couple of years, and consequently have done minimal cosplays, but as the slow start to more “normal” activity has been moving, I have had a few prop commissions that I’d love to share with everyone! So my plan is to post about a prop a week until I’ve made it through my backlog, and we’re going to start with a massive sword I made for my awesome friend HeckinSleepy!
Of the several commissions I’ve gotten since the pandemic began, Genshin has given me the most revenue. I can’t say I’m surprised given the game’s popularity, and how fantastic all of the designs are; I’m just amazed that I never fell into the trap lol. I did play some after getting several commission requests and thirsting over a lot of the designs and potential for fun cosplays to do but fortunately I had enough other stuff to distract me from getting in too deep. Anyway, one of the first Genshin props on my list was what turned out to be one of the largest swords I’ve ever made!

As with many of the Genshin stuff I’ve done, I was immediately filled with excitement to make something so impressive. That feeling was almost immediately replaced by dread and frustration as I tried to work out (1) what I was going to make it out of so as not to me insanely heavy, (2) the realization that I was going to have to light parts of it, and (3) the request that it separate somehow so that it would be easier to transport.
Because all of these things were intertwined, I had to think about them in tandem and work with HeckinSleepy to come pup with options he would be happy with. In the end, we decided the split made the most sense here:

Having the sword come apart at the base of the blade seemed like the best option for stability and functionality, and the design of the sword haad some built-in things that would help keep things together. It also meant that we could only light parts in the hilt, or else we’d need a second battery pack to power any of the bits in the blade itself, which we ultimately decided wasn’t worth the effort it would take to do that.
For materials, weight and stability were once again my primary concern; I knew using MDF for the base of the hilt was a no-brainer, but for the blade itself I ended up using large sheets of thick EVA foam (.25” I think….) so that it would be relatively lightweight and flexible enough to make joining and separating the pieces easier.
The only trouble with using EVA foam for the blade is that it needs structural support to not get floppy. So, first steps after cutting out the blade pieces were to dremel out a space for dowell rods and then glue the pieces together!

So, first things first, I made at least one mistake here: I didn’t put the reinforcing dowels all the way down toward the end, so it was still floppier than I wanted it to be, and in a rather crucial place! Later this would be reinforced by how the hilt pieces grip the blade section, but it was still concerning. My janky solution, because I didn’t want to have to pull the foam completely apart and potentially destroy it and need to start over altogether, was to take a metal ruler and shove it into the base so that it would help reinforce that section. Sadly I didn’t take a photo of that part because I was attempting to hide my sins, but the weird-ass improvisation runs strong in me XD
Now, if you look toward the base of the blade pieces, you might notice some additional channels there too. Those are going to help hold the blade in place when we stick it on the hilt.
And speaking of janky…

The rods that slide into those channels are absolutely some old wooden pencils I had lying around my craft room. It’s weird but they were the perfect size and shape for what I needed.
[This is why I never throw anything away, and consequently why I have entirely too much random shit in my craft room lmao]
As you can see there, we also have the MDF base for the sword hilt. I normally use .25” MDF for my swords and things, but this is .5” MDF. I went with the thicker stuff for several reasons: (1) the thickness of the blade meant the hilt would also need to be thicker than usual, (2) the thicker MDF is a lot sturdier, and heavier, so it counterbalances the weight of the blade better, and (3) I had a lot of other things I had to cram into/around the hilt base so the extra stability was key. They include channels for the wiring, a space for the battery (both of which you can see carved out in the photo), and the shafts for attaching the blade.
From this point, the hilt construction went more or less as-usual, with most of the details being added in as layers of foam sheeting, and eventually being dremeled into the proper bevels. I did, however, have to cast the translucent pieces where the lights were going.


The most relevant part in terms of the hilt construction is here, where the side details on the blade are actually a part of the hilt, and are what the blade section slides into. This keeps the blade stable by having points of contact on the inside of the blade (with the pencil shafts) as well as on the outside of the blade above and below. This isn’t foolproof and I still ended up adding industrial strength velcro to keep it from wiggling around too much, but it worked fairly well all things considered.

The details on the flat of the blade are actually slightly raised… mostly because I don’t trust myself to freehand a straight line, much less the 6 thin, parallel straight lines that run the length of the blade. I used a sheet of poster board, which I transferred the pattern to and then cut out with a craft knife. Also, as youo can see in the photo below, the side sections of the hilt which I described above were covered in a layer of warbla to make them rigid, since the foam on its own was not going to do that.


The well for the battery sits underneath the top grey portion, and so the separate piece that is sitting next to the hilt is the part that is removable to reach the battery. I unfortunately can’t find a photo of the battery housing from the other side such that you can actually see how it goes on, but it fits nicely over the red half-orb on the other side.
With all of the structural stuff done and tested, all that’s left was priming and painting (which you can already see starting to happen on some parts of the sword). The biggest pain in my ass was making a steady gradient from red to black… repeatedly. The gradient moves one direction up the base of the blade, and then the opposite direction on all those parallel lines I complained about earlier, which is yet another reason why I sure as heck wasn’t going to be freehanding those!

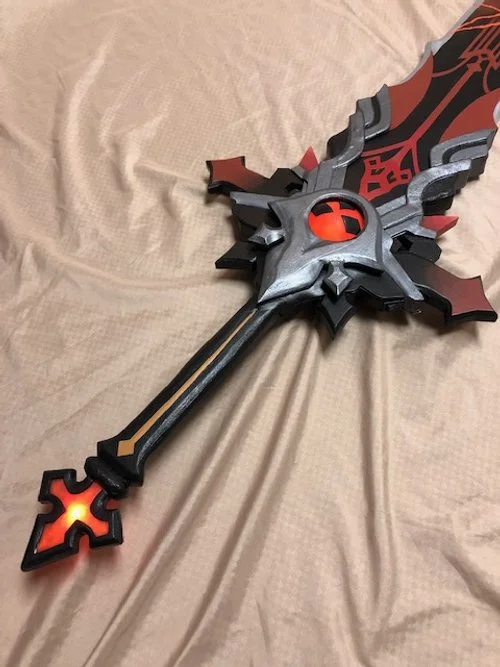
Despite being truly a beast of a project, I am insanely pleased with how this turned out, especially given the extra difficulties I had to incorporate (i.e. the lights and removable section). Here’s the finished sword in all its glory!


Since we skipped lighting any of the blade, I wanted to at least do something with the day-glow orange veins so I used neon paint such that they’d glow under UV/black light.
If you’re not already following HeckinSleepy, you totally should cause he’s an awesome dude. Also because he has a lot of props I’ve made so you’ll be able to see some of them out in the wild, and in the actual context of some beautiful cosplays!