Contact Us

Questions? Comments? Concerns? Suggestions? Submissions? Shout-outs?

Whatever you want to tell us here at Mikey Does Cosplay, we're always happy to hear your thoughts and feedback!


123 Street Avenue, City Town, 99999

(123) 555-6789

email@address.com


You can set your address, phone number, email and site description in the settings tab.
Link to read me page with more information.

reflection.jpg

Blog

Here's where the magic happens. I'll be posting about all of my experiences and experiments (both failed and successful ones), introducing you to my costumes, sharing fun stories, linking tutorials and useful products, and who knows what else!


Filtering by Tag: frog

I'm Not Dead Yet

Michael MacWolff

Welcome back folks! I know you’re all used to my spastic and inconsistent posting at this point so hopefully anyone who wants to see regular stuff from me knows to follow me on Instagram.

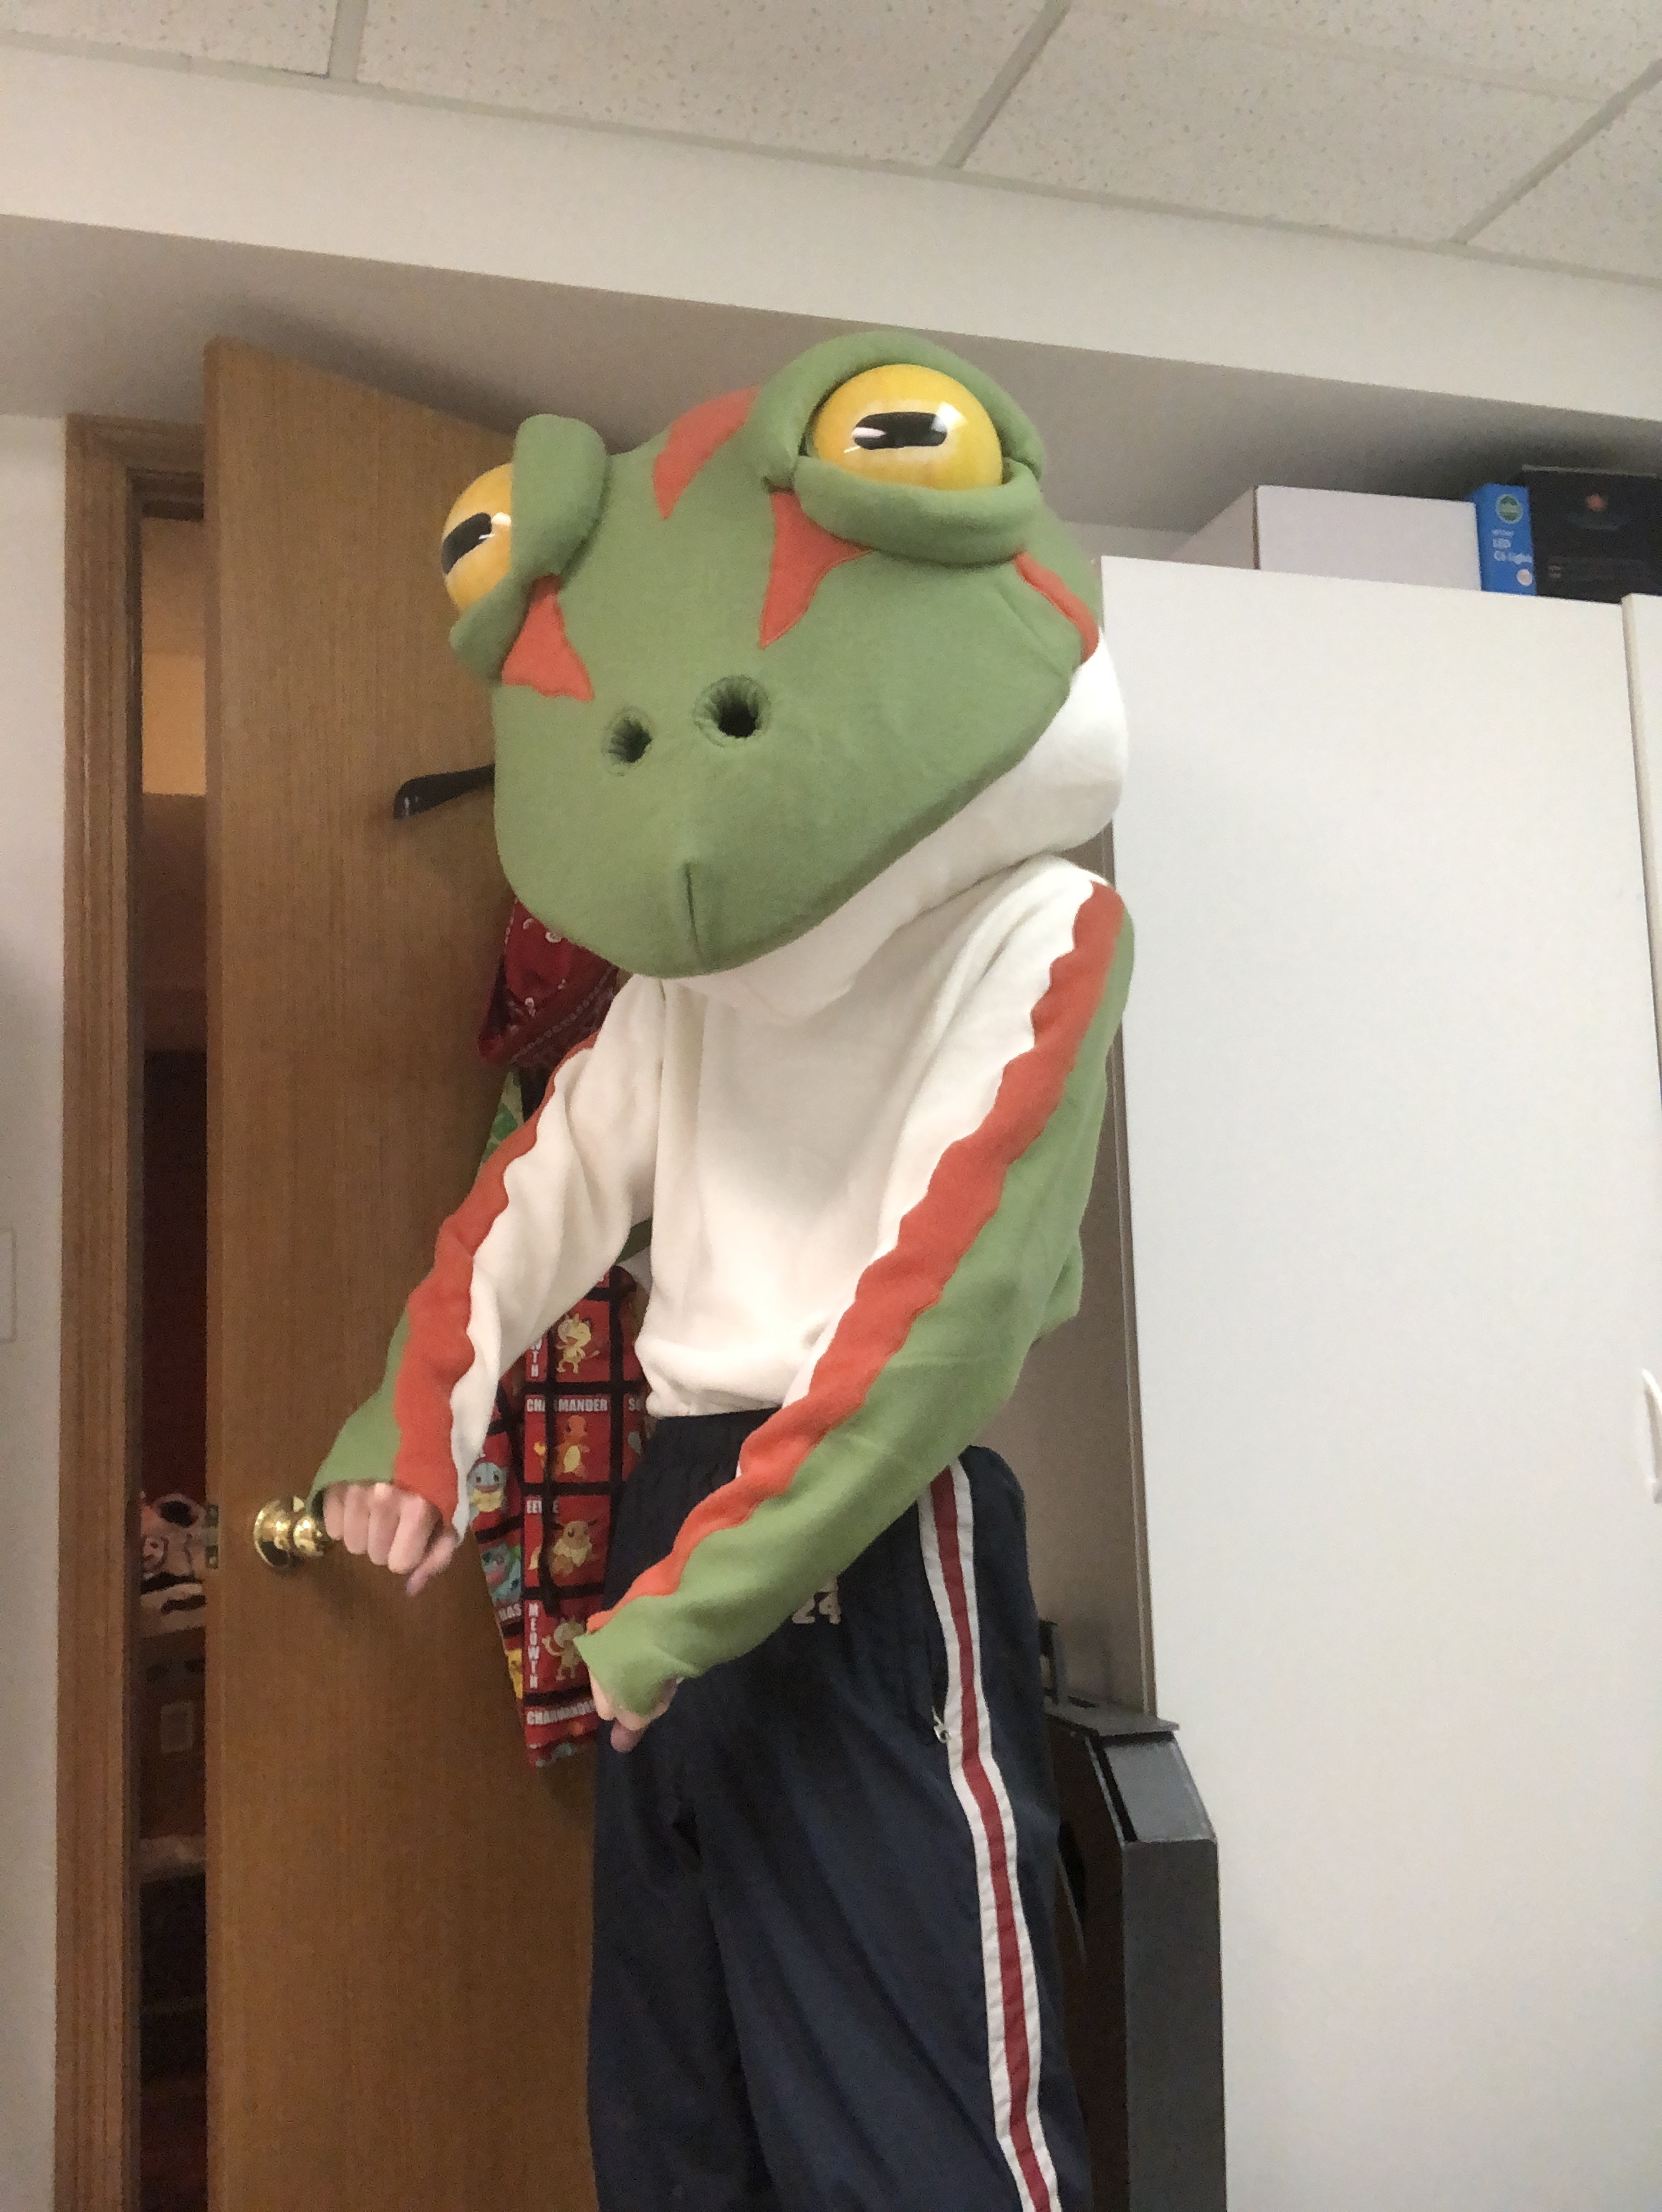
So since it’s been two whole months since I posted anything, lets’ dig right into it! First up, I want to share some awesome photos I got of Frog, thanks to my wonderful husband <3

IMG_3409.JPG
IMG_3425.JPG
IMG_3436.JPG

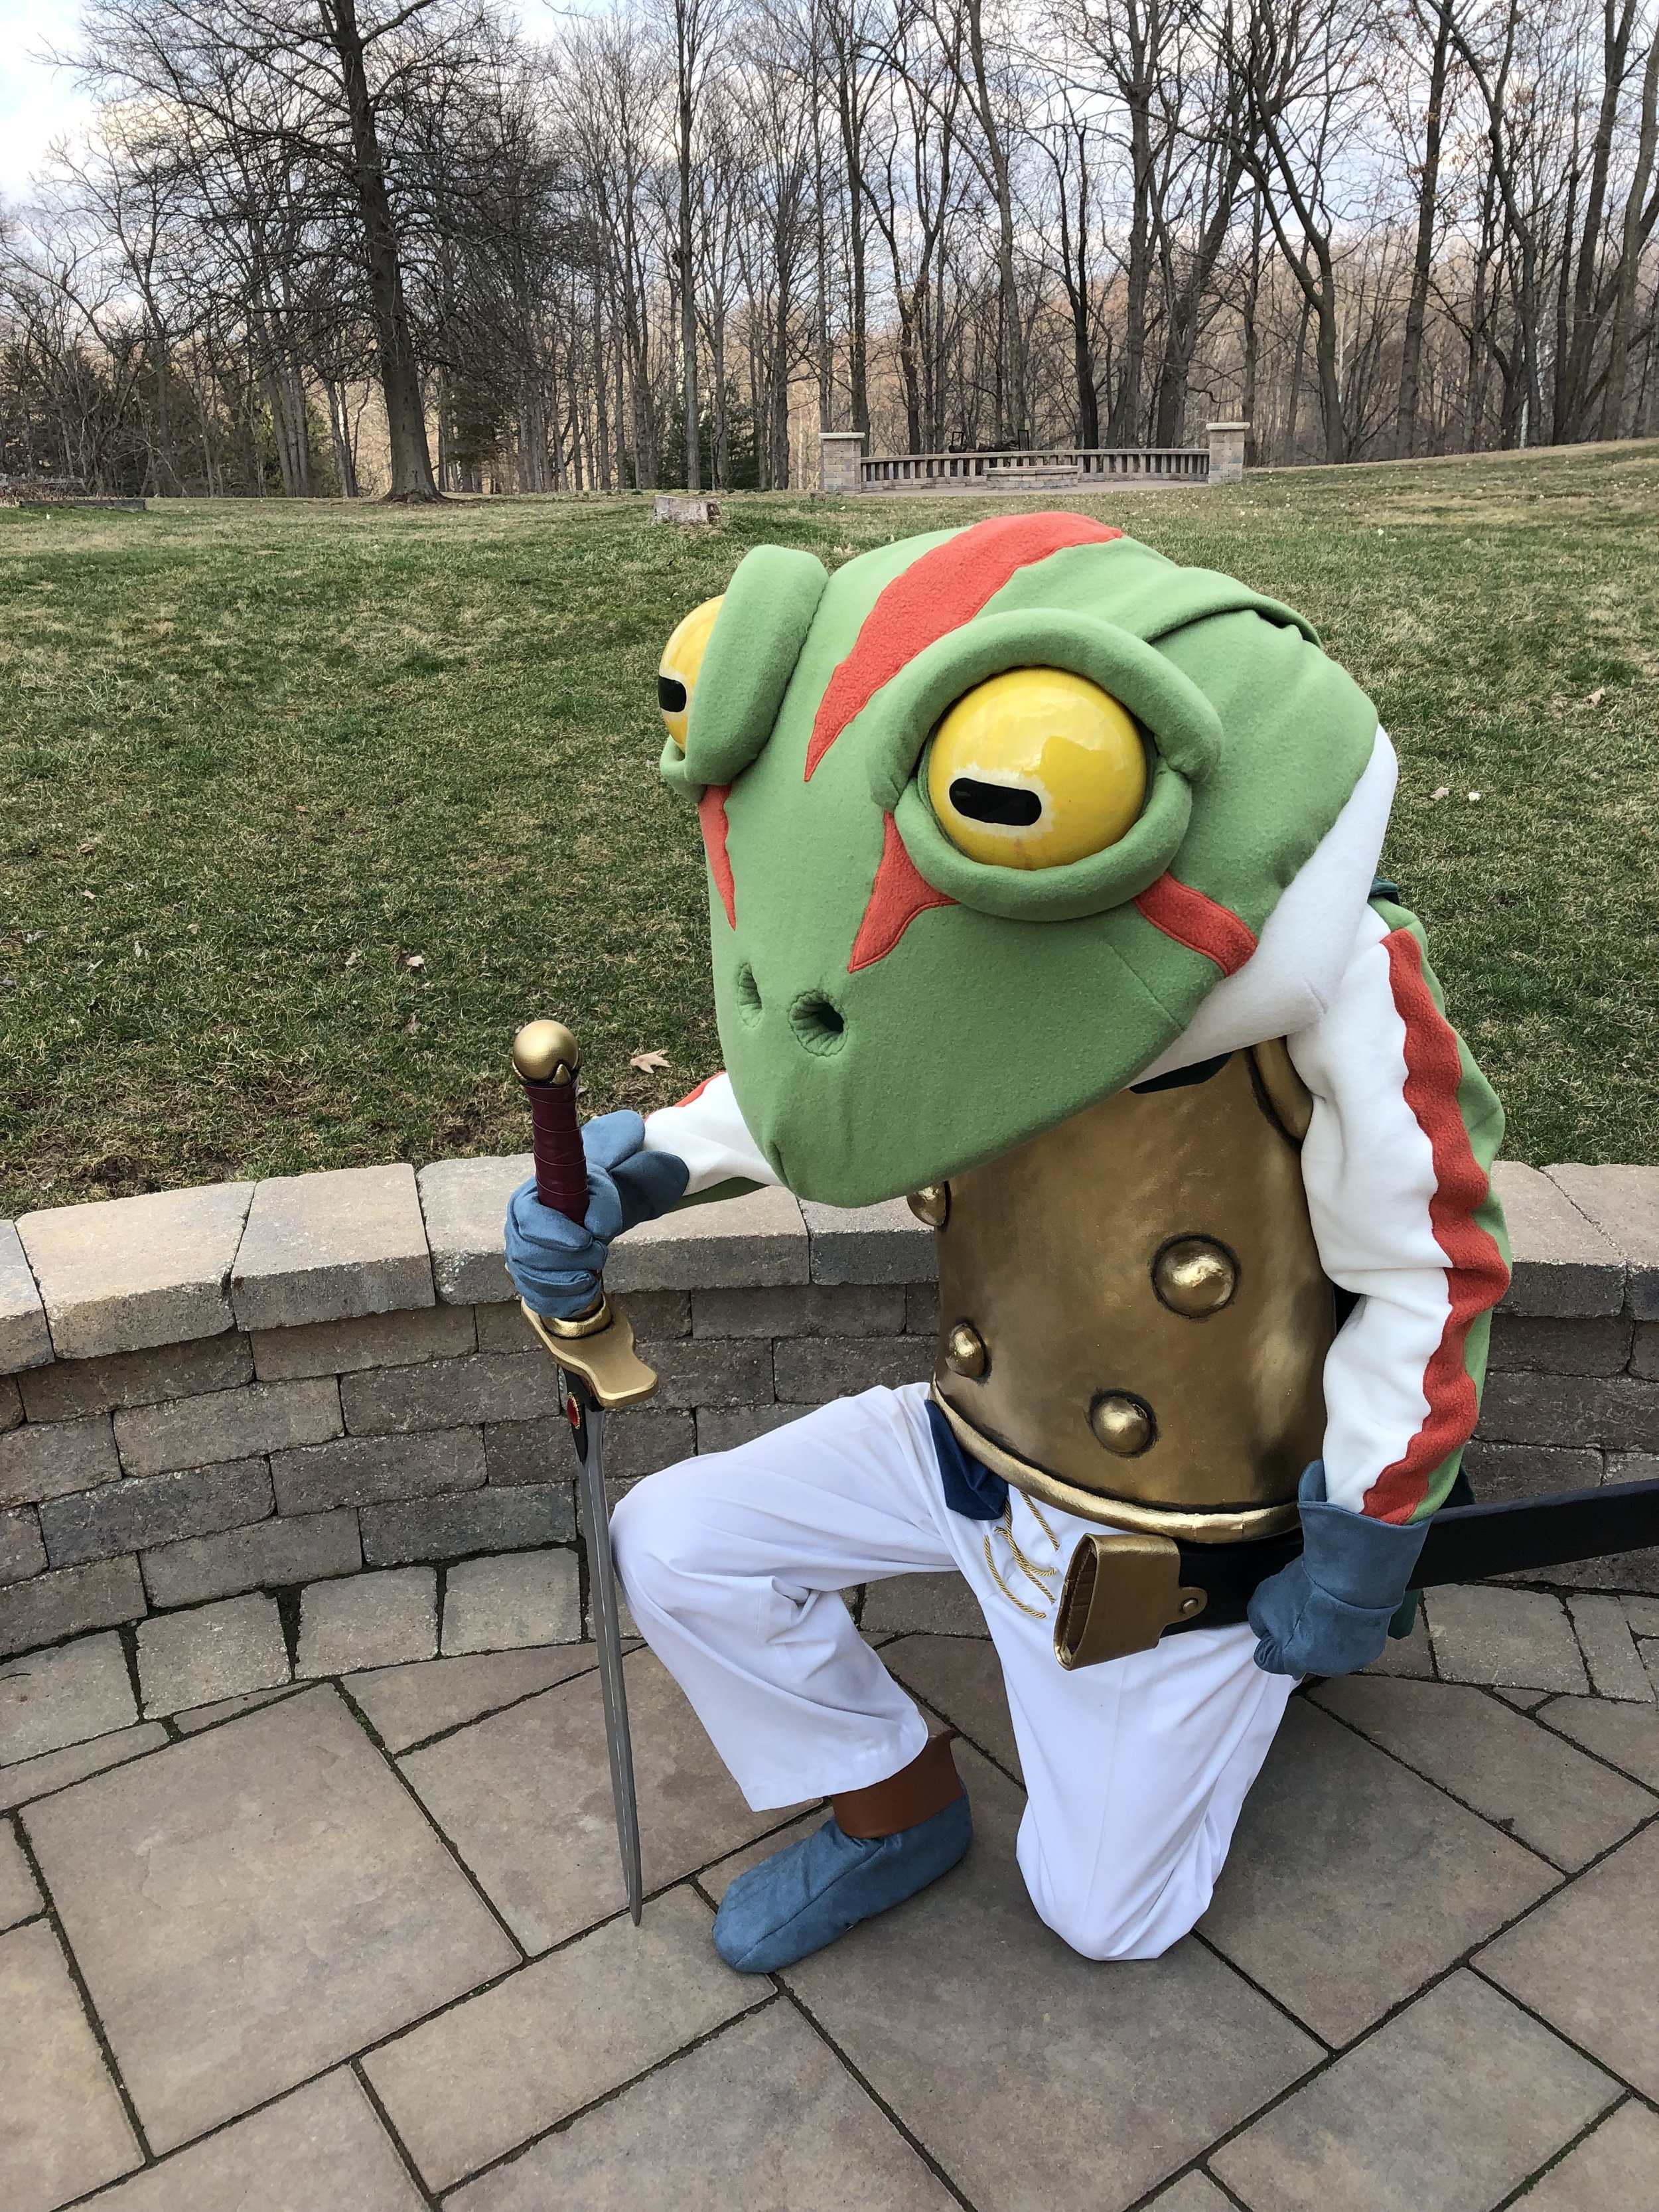
I’m so stoked with how he came out!! I had a lot of fun wearing hi at Tekko and was recognized by quite a few people. I even met a guy who had the whole cast of Chrono Trigger tattooed on his arm!! I have a few friends who cosplay some of the other characters so I’m looking forward to eventually having some friends to wear this with.

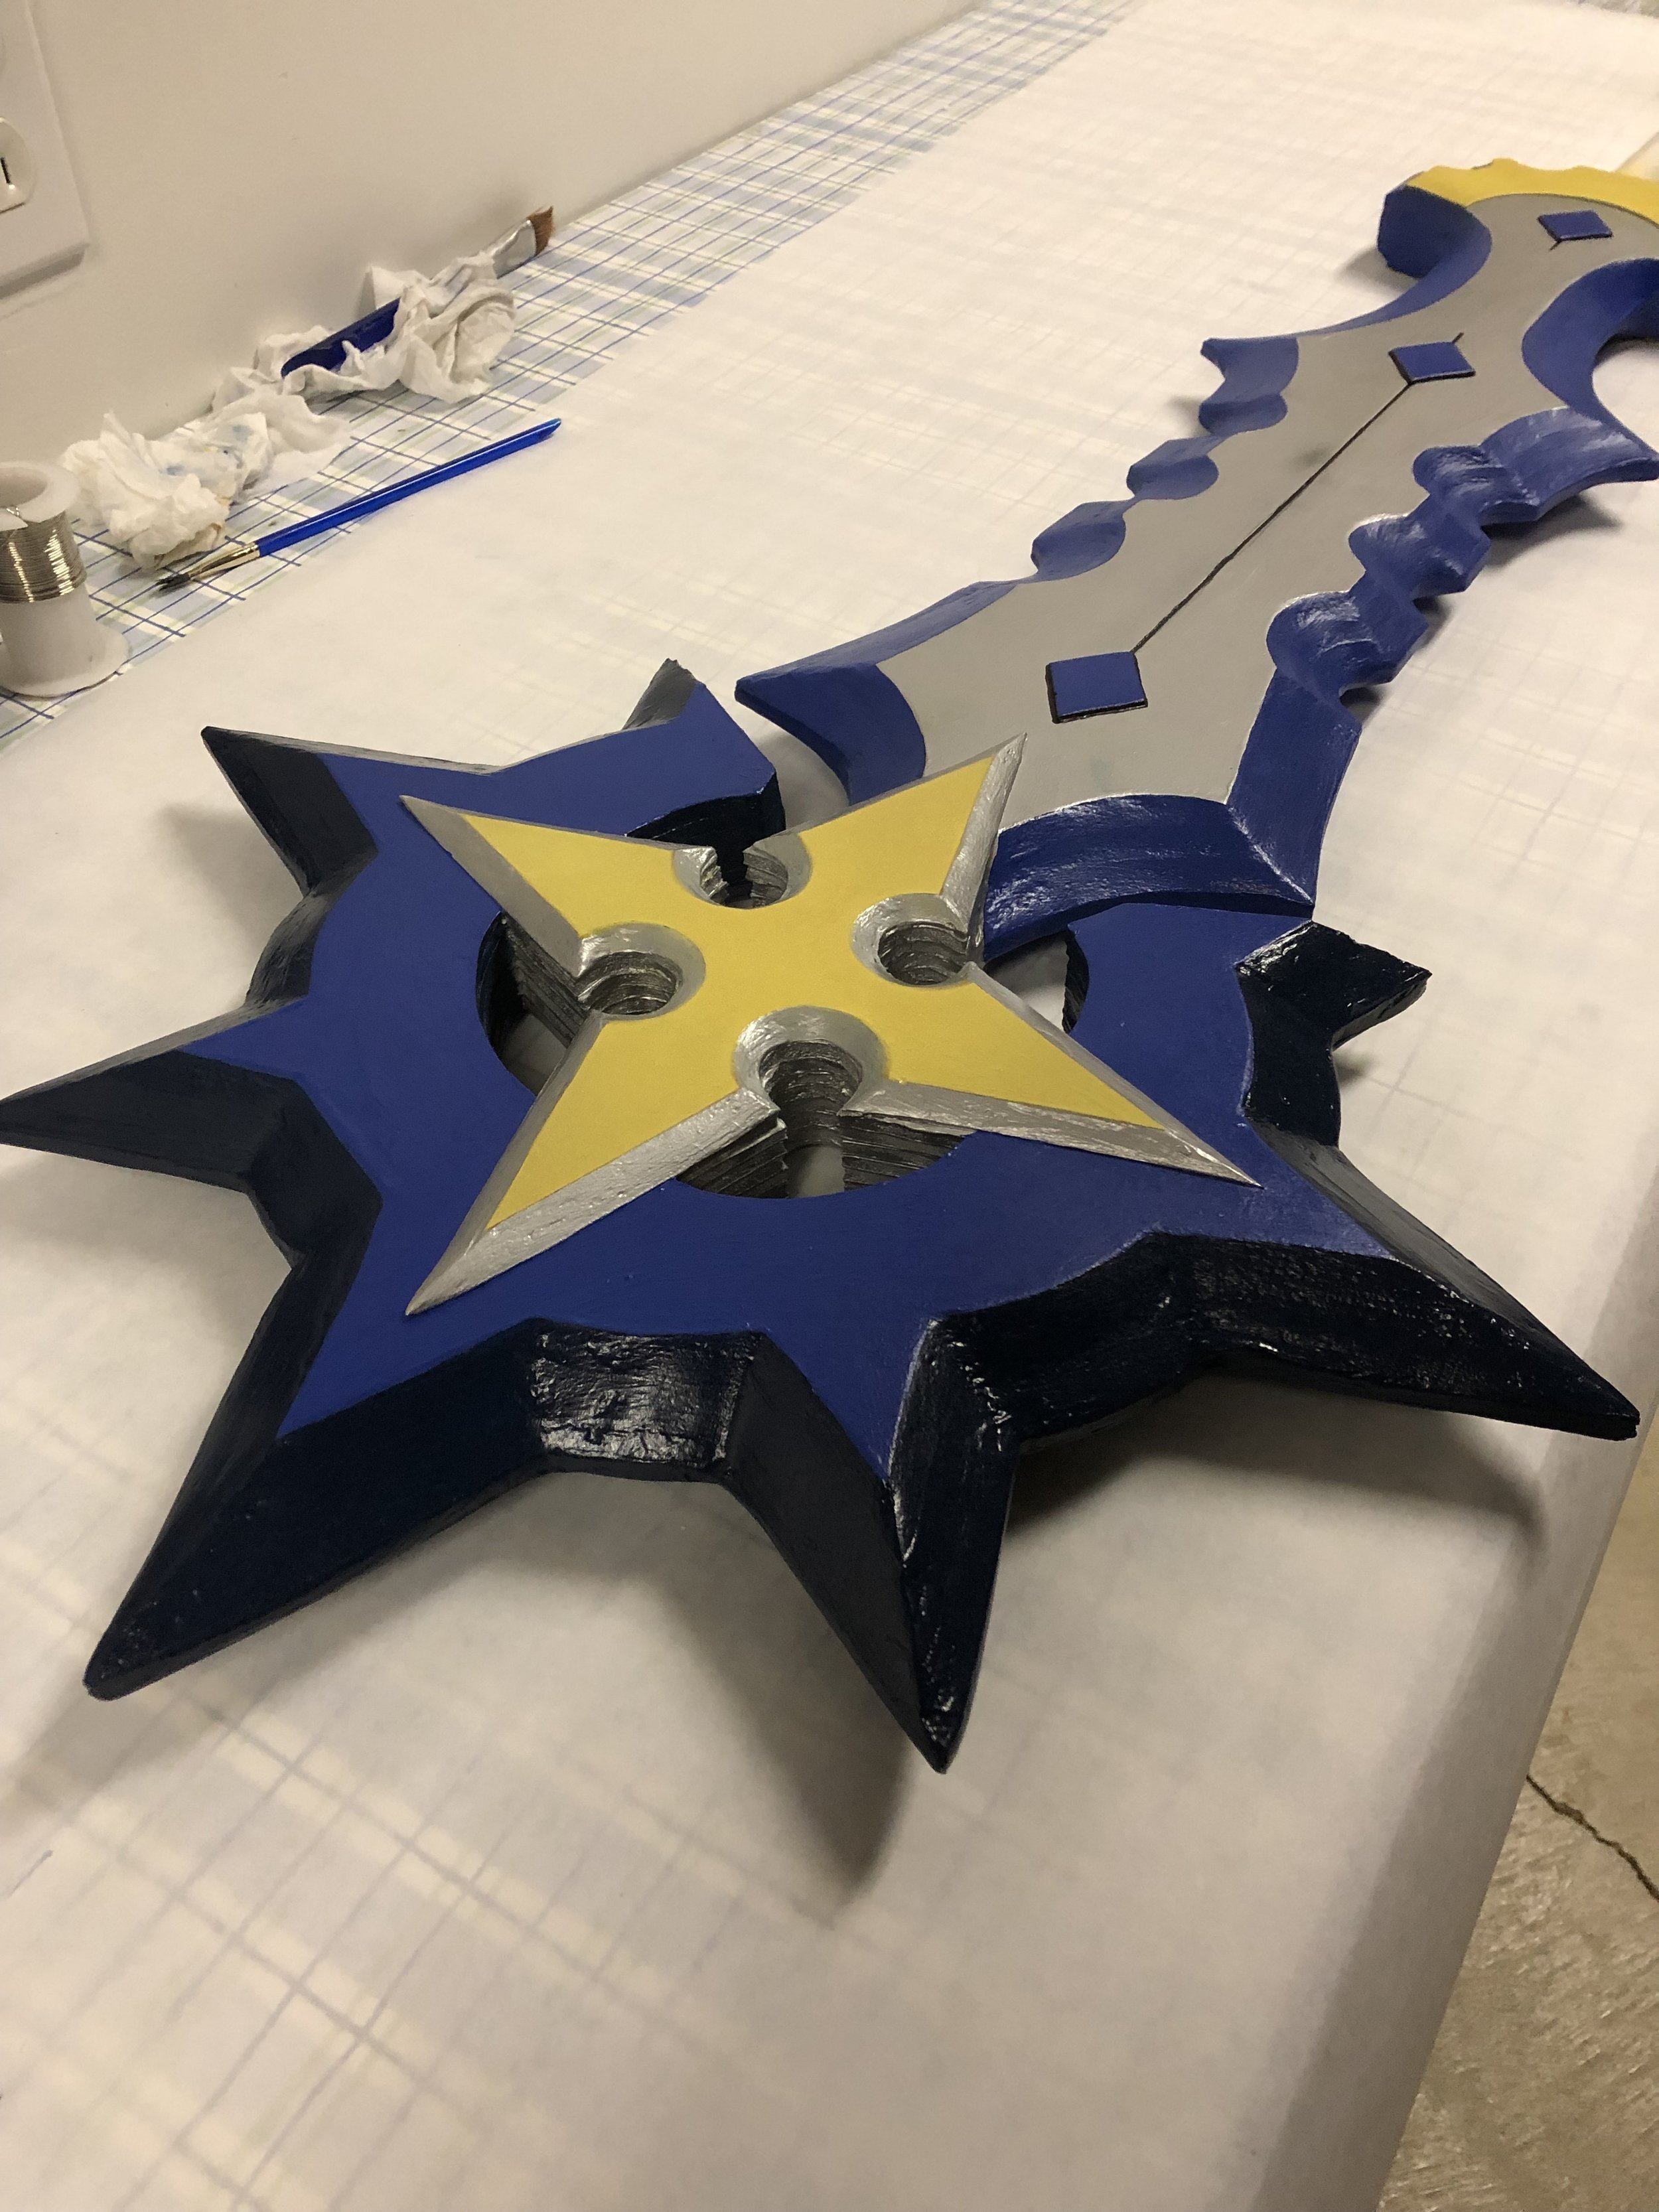
Since Tekko, I’ve been working on a few commissions, along with another new cosplay for myself. My first commission is one that I put together pretty quickly for a friend of mine to take to Acen last weekend. While I’ve played Kingdom Hearts 1 & 2, I’m not overly familiar with the series, but I had a lot of fun making Saix’s Claymore.

PgrM7UoS.jpg

I made this guy out of layers of foamcore, with a wooden broom handle for the core/handle. Here you can see the central layer and the broom handle, along with the patter I used for it.

IMG_3456.JPG

Once all the layers were done, I bevelled the whole thing, which took an exceedingly long time, and then coated the exposed foam layers with spackling paste.

Since the bevel spanned multiple layers, I cut them in tiers so that I could sand the foam into an even bevel.

Since the bevel spanned multiple layers, I cut them in tiers so that I could sand the foam into an even bevel.

Here’s the spackling paste gooped along the edges of exposed foam.

Here’s the spackling paste gooped along the edges of exposed foam.

The rest consisted of a few hours of sandeing, several coats of mod podge, and some paint!

IMG_3850.JPG
IMG_3849.JPG

I don’t often have the opportunity to share photos of the full cosplay with my prop commissions, but fortunately for me, I have this wonderful gem from aprinceforflower’s instagram!

Doesn’t Tobi look badass?!!?!

Doesn’t Tobi look badass?!!?!

With that done, I took my opportunity to finish up another commission that I started quite a while back. From Baten Kaitos, the obscure but asewome Gamecube title, I’m making the main protagonist, Kalas’s, weapons.

Kalas.jpg

This will be my first of several Baten Kaitos projects as several of my friends and I are planning a group for Youma this year, so I’ll have my own new cosplay to work on, as well as some items for at least one other member of our group.

I don’t have as many progress photos of these that I can find, since I’ve been working on them periodically for the past several months.

The base of both blades are MDF, and there are some wood elements for each one as well. I used a dowel that I split up the middle for the knife handle so that it would be round, and I used thin plywood pieces for details on the sword, to help with s…

The base of both blades are MDF, and there are some wood elements for each one as well. I used a dowel that I split up the middle for the knife handle so that it would be round, and I used thin plywood pieces for details on the sword, to help with stability.

IMG_3098.JPG
For the hand guard on the knife, I used a piece of cereal box with worbla covering both sides. I heated up the whole thing and shaped it around a marker to get the curved bit on the end.

For the hand guard on the knife, I used a piece of cereal box with worbla covering both sides. I heated up the whole thing and shaped it around a marker to get the curved bit on the end.

For the rest of the details on the sword, I used layers of craft foam, and some wooden tokens that I got from my orthodontist as a kid XD

For the rest of the details on the sword, I used layers of craft foam, and some wooden tokens that I got from my orthodontist as a kid XD

As per usual, a lot of sanding and mod-podging ensued, until I could paint these suckers!

IMG_3170.JPG
IMG_3953.JPG
IMG_3951.JPG

And here we have the finished products!

Along with that, I have another finished project, which is something I’ve made twice before already. I’m referring to Isabela’s Jewelry from Dragon Age 2.

8c03e3bf5e318ca74486da90945bf9be.jpg
download.png

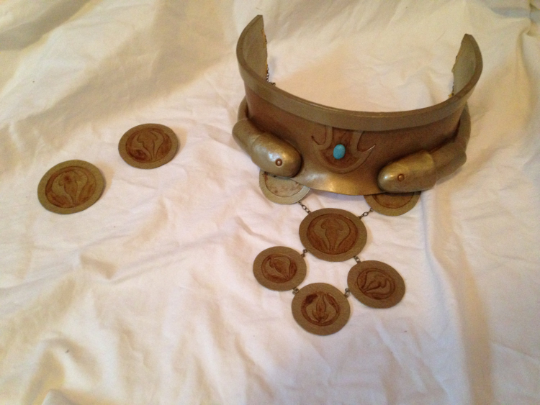
This was the first time I made this, nearly 5 years ago, as one of my first commissions. It was made out of craft foam, model magic, and cereal boxes. This time around, there’s still some craft foam for the base, but most of it is worbla. The buggest improvement was figuring out how o shape it such that it was less neckbrace-y. The improvement is… stammering, to be honest.

This was an incredible thing to see just how far I’ve come. I mean I know I’ve improved a lot since I started taking commissions, but to have a direct comparison like this really shows it.

And that’s all I have for you guys! I’m working on a new cosplay for Matsuricon, as well as a few other commissions, so don’t forget to follow my Instagram for updates as those projects come together. And eventually I should be posting them here too.

Ribbit

Michael MacWolff

Hey folks, I’ve been hard at work getting my newest cosplay together and I wanted to show you all how that’s coming along!

You’ve already seen the beginning stages of him, but Frog is nearly done at this point, with the exception of a few details.

IMG_3093.JPG

The most major thing you all haven’t seen yet are Frog’s sword and shield. The shield is actually a plastic Captain America sheild I ordered online. It was a bit bigger than I needed it to be so I cut off the outside layer of the bullseye. I also came up with a lotus emblem (seemed appropriate for a pond-dwelling amphibian), since you never actually see the front of his shield in any of the official artwork. I also used thin vinyl tubing around the outside to give it a nice edge. I sliced along the tube so it fit around the edge of the plastic sheild. It’s not the easiest to see in this photo since the tubing is transparent, but in the painted photo you’ll be able to see a little better.

The sword is all made from 1/2” MDF board and is quite sturdy, and a bit hefty, but I really like the feel and weight of it. Thankfully I’ll have it in a scabbard most of the time to the weight shouldn’t be an issue at conventions.

IMG_3102.JPG
IMG_3105.JPG

Here’s the shield with just the base gold, and then the finished shield after I did the detailing. Looks a bit less obvious now that it originally belonged to Cap ;-)

IMG_3106.JPG

Here’s the full sword build, with almost all it’s details (except the gems on the blade which I added once it was all painted). The orb on the end is a wooden sphere I had in the collection of weird wood bits i have in my stash. For the grip, I wanted to get the curved, round shape to the best of my ability, so I used some extra pieces of the foam pipe insulator tubes that I bought for his armor (the stuff I used for the raised/rounded edges) and cut them up a little more, then wrapped it with masking tape to squish the foam further into the size/shape I wanted. The tape is a little messy but it’ll be covered in a later step so it doesn’t really matter.
The raised details are craft foam (the green section), cereal box cardboard (the flamey pattern at the base of the blade), and worbla scraps (the claw pieces around the sphere on the end of the hilt).

IMG_3100.JPG
IMG_3101.JPG

With the build all done, a couple of coats of mod podge and some detail sanding, it was time for paint!

IMG_3122.JPG

As is my usual M.O. I spraued the metallic sections, starting with the gold. Once I had the gold sections finished and sealed with mod podge, I covered the hilt with a plastic grocery bag and sprayed the blade silver (I don’t have a photo of that step though). With that done, there was just some detail painting on the little flamey designs and the foam detail (that started out green but needed to be black). With that all done the last steps were adding the gems to the blade and wrapping the grip. For the grip I used stretchy vinyl that I happened to have sitting around (I think I got it on clearance a long while back and intended to use it for steampunk stuff… that obviously never happened lol). The vinyl is hot glued on, which I attached the start, and then glued in periodic spots as i wrapped the strip of vinyl. Here you can see the results of these last efforts.

IMG_3138.JPG
IMG_3139.JPG

I am incredibly pleased with how this turned out, I’m pretty sure this is the best quality sword I’ve made yet, which is super exciting!

The only detail left to share is the fully painted armor, which is now ready to go!

IMG_3094.JPG

With all of that done, there are only a few small details to finish before he’s con-ready!
I still need to make his gloves and boot covers, his little purple pouch that he wears at his waist, and I need to find a workable belt. So with what’s left, he’ll definitely be coming to Tekko with me, as originally planned!

That’s all for now, folks. I’ll have Jordan take a photo of me in all the bits once they’re finished. You can also continue to watch the other commission pieces I’ve been working on intermittently on Instagram to stay up-to-date, but I will make another post on here int he next week or so about those projects!

They're Outta Here!

Michael MacWolff

Welcome back everyone! Sorry for the hiatus, but I’m currently smack in between two vending events so I’ve not been doing as much cosplay work to focus on having enough inventory for my shows! However, I have finished two major projects and I have some other stuff in the works and I’d like to share all that with you lovely people.

IMG_2843.JPG

First up we have the finished suit of armor that I’ve been working on! I’m super happy with how this guy turned out and I can’t wait to see Indi in it cause they’re gonna be such a wonderful Silas!


IMG_2790.JPG

My second finished project is the Dark Magician staff I’ve been working on for a long-time customer of mine! And yes, the orb on the end does in fact glow!

I’m happy to have my first two commissions under my belt for the year and I look forward to seeing both of my customers’ full cosplays when they’re all put together!


Next on the list I have some minor progress on my current personal project which you’ve already seen some work from. That would be Frog from Chrono Trigger, who I’m hoping to debut at Tekko in April. I already have the head 90% done (I just need to add a few small details like barbels and tympanum). so I started working on a few other bits. Thankfully the pants are just plain pants, but I needed a shirt that looks like his skin so I made one with the leftover fleece from the head so it would match.

IMG_2842.JPG

I did my best to show off all 3 colors here, since the front is all white and the back is all green.

I’ve also started putting together his breastplate, which I’m making out of 3 different types of foam.

IMG_2955.jpg

The base is a large peice of EVA foam floor mat, with the weird texture facing the inside. The white bubbles are halves of styrofoam balls, and the rounded edge is part of those foam insulation tubes that you get to insulate pipes and things (you can find them at the hardware store. I also have some heavy-gauge galvanized wire on the inside to help it keep its shape since I don’t plan on putting worbla on the outside of this guy, I’m gonna try doing a plasti-dip coating instead. Unfortunately I can’t really do that until it gets a bit warmer, so this is about as far as that part’s gonna get for a bit.


The last project I’ve started is a new commission from a friend of mine who’s a member of my steampunk group, the Cleveland Zeppelin Union. It’s not actually a steampunk project but it seemed like a good reason to plug our club. Anyway, it’s actually a project I’ve had before, but it’s been quite a few years since I had my first go at it. It’s Isabela’s necklace from Dragon Age 2.

download.png

This was my first go at this project, which for reference is from 2014. It certainly doesn’t look terrible, but unfortunately my client wasn’t super happy with the way it fit so I ended up having to redo it. Regardless, I think this definitely shows how far I’ve come over the last 5 years.

IMG_2961.JPG

Between my familiarity with materials, my greater attention to detail, and just having a better feel for how to use what I have to make something look nice, this is going to be a major improvement over the foam pieces I made in 2014. Beyond that, I’ve been a lot more proactive with looking online to see if and how other cosplayers have made their stuff. Much like with constructing Frog’s head, I managed to find an awesome Isabela cosplayer who had a detailed description of how she made the jewelry (and the rest of her cosplay). So a big shout-out to Azzura on RPF for guiding me on this project!

I obviously still have a good bit of work ahead of me, but I probably won’t be doing much more work on this stuff until after my second event (which is the first weekend on March). I may try to crank out Isabela’s necklace though, so I can get it to my friend sooner rather than later.