Contact Us

Questions? Comments? Concerns? Suggestions? Submissions? Shout-outs?

Whatever you want to tell us here at Mikey Does Cosplay, we're always happy to hear your thoughts and feedback!


123 Street Avenue, City Town, 99999

(123) 555-6789

email@address.com


You can set your address, phone number, email and site description in the settings tab.
Link to read me page with more information.

reflection.jpg

Blog

Here's where the magic happens. I'll be posting about all of my experiences and experiments (both failed and successful ones), introducing you to my costumes, sharing fun stories, linking tutorials and useful products, and who knows what else!


Don't eat me!

Michael MacWolff

Well, with all of the Fire Emblem stuff I've been doing lately, I thought it'd be a great time to show off my newest costume in my repertoire! It's not quite finished and it hasn't been debuted yet, but I have lots of progress pics and it'll be done soon!

I'm a bit sad to say that it's an Awakening costume. Don't get me wrong, I enjoyed Awakening, but it's not my favorite of the series. I do love that it brought so many new fans to this wonderful series. I also like a lot of the new features, including the ability to play on casual or classic mode. I think that was a big help for people new to the series. Also, infinite supports is a beautiful thing, and it totally made sense to change the way support bonuses worked as a result. If everyone has crazy bonuses for everyone nearby that'd be a bit cray. I'm a bit torn about the pair-up system. I like the fact that it makes more sense than the rescue system (Katie Tiedrich makes fun of it best), and it's aweseome that you can get extra attacks and knock people out of the way. The only trouble is, I only ever end up using half my team and as such my healers are waaaaaaay underleveled. Thankfully there's all of the side missions and such that let me catch up on experience, though you all already know how I feel about the non-linear ones but that's beside the point. Which brings me to the last bit: reclassing. That bit is the one thing that drives me nuts. I will admit, it's nice to be able to reclass my favorite characters so I can diversify my army and still use the units I want, but I also like that most characters are so closely tied and associated with their class and as such it feels kinda wrong to change them on a personal level. And things don't make sense quite often when you change certain classes. Like anything involving Cherche/Gerome in which they are no longer riding a wyvern and they're still constantly talking about Minerva. That's just silly.

But I've digressed for long enough, because I really don't have any serious problems with the game, and I'd actually like to continue playing my more recent playthrough with my female avatar so I can marry Yarne and have bunny babies!

Which is a great segway to my new cosplay, it's that very bunny baby o' mine: Yarne!

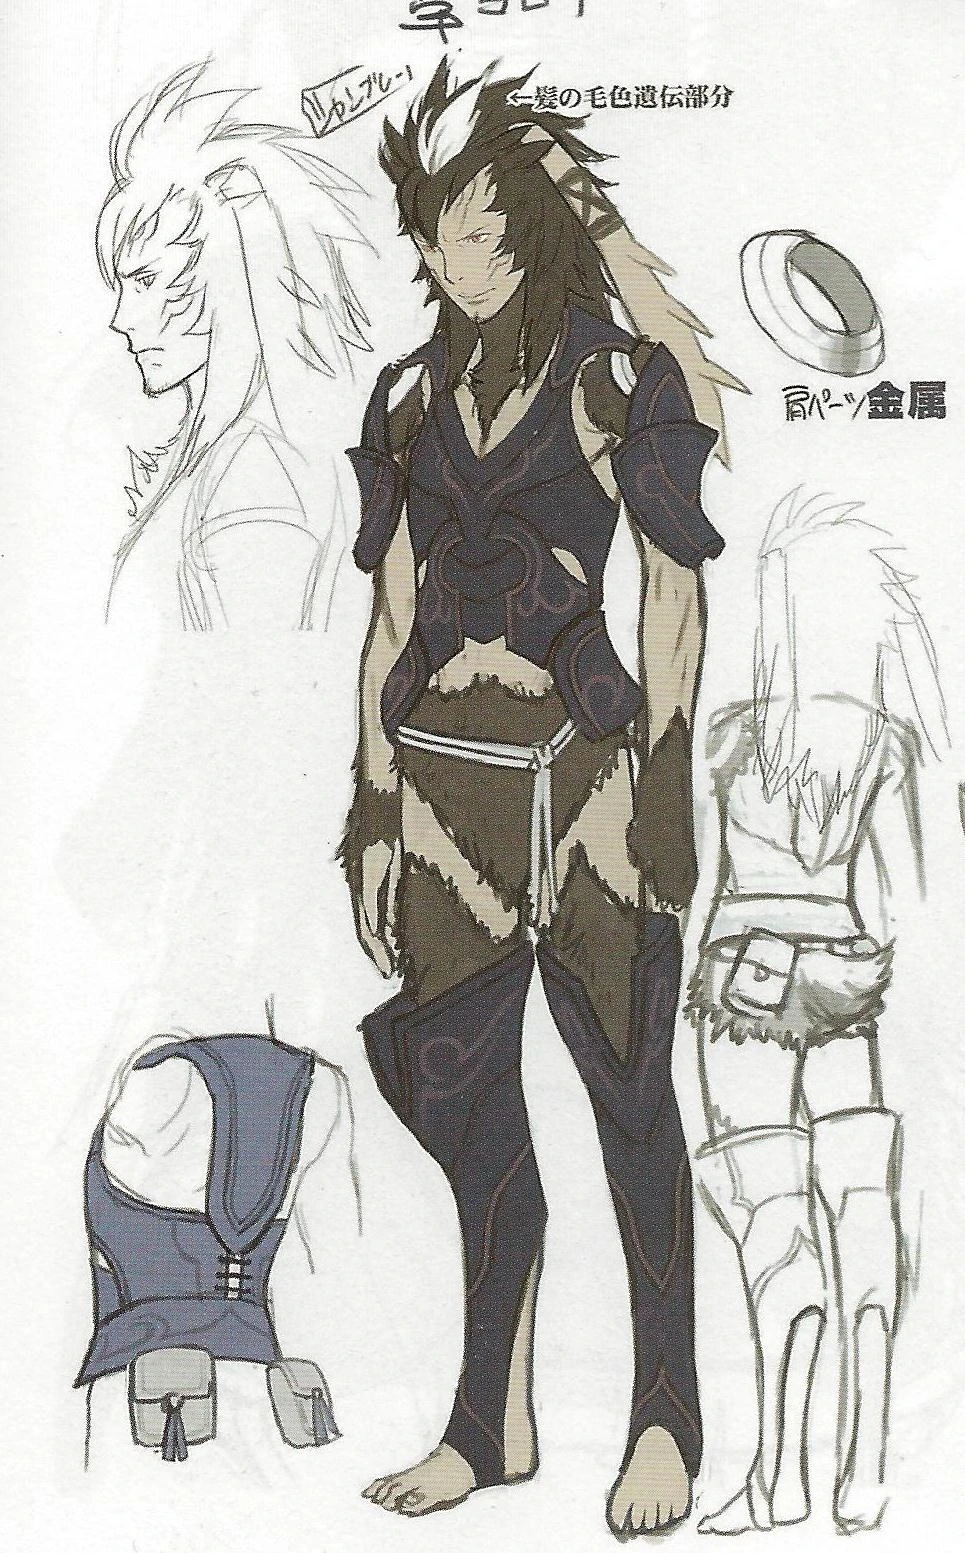
First off, Naga bless the Fire Emblem team for having such wonderful concept art that has all of his bits and pieces easily visible and detailed such that I can figure everything out! This is the hardest job for a cosplay with a lot of detail because finding good artwork or sctreenshots from different angles is a pain and playing through the whole freaking game to get little glimpses and try to either photograph them or sketch them is a painful undertaking.

So, on to planning! I spent a lot of time considering what I wanted to make Yarne's armor out of, as he's a more agile character so it didn't really make a ton of sense to have it be legit armor, like plate mail or anything, and as such I didn't want to use methods to duplicate that when it's not the idea I was going for anyway. Usually for heavy armor I'd be using craft foam, but for Yarne it seemed more like a leather armor-type deal so I decided to go with vinyl (cause finding or dying leather that shade of blue was going to be a royal pain in my ass). Thankfully I found some navy blue vinyl at Joann's (and had a nice coupon to use on it) and bought a few yards to play with. Drafting the patterns for all of the little individual pieces in Yarne's chest armor was interesting, because they all overlap in rather odd ways. I ended up having to do several sketches to conceptualize everything properly, but ultimately I got all of the pieces drafted out.

yarne-pattern

As you probably noticed, some of the pattern pieces look like they're made from old shirt... cause they are. I took a shirt I bought at the thrift store and put it on my dressform, then drew out the pattern for a couple of the main pieces so I could get the sizing and placement right . The rest I made on dust paper, which is my usual go-to for drafting my patterns.

Once all of the pattern pieces were done, I sketchedthem out on the back of my vinyl and cut everything out. I was a bit concerned with how the back of the vinyl would feel against my skin so I also got midnight blue flannel to line the back of each piece. I stitched around the outside, flipped the pieces, then ran a topstitch all the way around each shape to keep them flat (since you can't really iron vinyl flat).

yarne-armor-pieces

That was the simple part. Now comes all of the beautiful detailing on the armor, which in retrospect I should have done on the vinyl pieces before I attached the flannel to the back so I could machine applique them on... but I didn't. Instead I took the silver satin and fused interfacing onto the back, sketched out the pattern, ran a tight zig-zag stitch along the outside of each shape, then cut them out. I used clear nail polish around the edge of each one to keep the satin from fraying and then hand-stitched each piece to the vinyl. This was the most time-consuming thing I think I've ever done. And also incredibly dull, and painful on my fingers cause sewing through vinyl is not easy. But alas, the things we do for cosplay. Unfortunately I don't have any photos of the detail pieces before they were attached, so here's a picture of all of the pieces put together!

yarne-armor-full

The little shoulder rings actually have compressed paperboard in them (cereal boxes ftw!) to keep them nice and rigid. That pretty much just  leaves his furry bits, which were all retty simple to put together and everything attaches to itself with velcro so it's nice and simple.

Sorry for the blurry photo, I'm not a very good photographer

Sorry for the blurry photo, I'm not a very good photographer

And that's Yarne! I do have a few small things left to do for him, mainly styling his wig (which I am not looking forward to) and making the little pouches he wears on his butt. I love characters that have pouches cause then i actually have someplace to carry things!

I'll be wearing him for the first time at Colossalcon, which is in just under two weeks! I'm super excited about it and I can't wait to go! I'll be sure to have photos up after I'm back of our dear bunny in his natural habitat XD

Thanks for tuning in, folks, and I hope everyone is enjoying their Memorial Day!

Many Emblems Gently Flaming

Michael MacWolff

Yes, I'm back to talk to you about more Fire Emblem stuff because... well, why the heck  not? As you probably gathered form my last entry I'm minorly..............ok, majorly obsessed with these games (though not to the point where I've played the old ones released only in japan, I should get on that), and recently I've had the fortune of having several of my prop commissions actually be Fire Emblem weapons. They're all from Awakening too, which is not at all surprising considering that it's the most recent game and certainly the most popular.

Interestingly enough my first prop commission was also a Fire Emblem item, though it was from the Tellius series since Awakening wasn't out yet. I made a lovely little Lehran's Medallion for someone. I went into it thinking "this is going to be easy" and as soon as I looked closer at the reference artwork I quickly realized the error in my thought process. Every time I'd seen it in the game it just looked like a disc with some carvings on it... but not so much.

In order to get the proper shape for the interior of the medallion I needed cereal boxes, paper straws, some modeling clay (which you can't see in the photo) and those wierd teardrop stickers. Then the outside was a masking tape roll that I cut in half... which was a royal pain in my ass.

There was also come craft foam, brads, and a couple of little metal rings that went into creating the final shaping.

The end result turned out really nicely but it was much  more of a beast of a project than I was expecting.

Thankfully for my three recent FE props, I had much more experience under my belt so I could much more easily and quickly come up with a creation strategy for each one. Also, they're all bigger and more fun to play with because they're all weapons. Yay shiny instruments of death!

The first was a Lightning Axe I made for my friend Josh. He was a friend I made specifically because of Fire Emblem cosplay so I suppose it's only appropriate that he's up first. As with many of the larger props I've been making recently, the axe head is a floral foam base with lightweight filler putty coating the outside.

I like using this method for stuff because shaping the foam is pretty easy with a knife, and if you accidentally do something wrong or cut out a chunk you weren't supposed to, you can just glue it back in and smooth it over with the putty. Good as new! It does take a long time to sand the whole thing, but hey, you've gotta do what you've gotta do. It's also nice and lightweight, which is good for props you're carrying around all day and makes shipping a lot more reasonable too :-)

The rest is pretty simple: pvc handle with a cap fixture embedded in the axe head so you can remove the handle for easy storage & transportation. The knobby bits on the handle are made of paper clay, which works well for that sort of detail because it's strong enough to stand on its own and can be sanded when you gloop on too much.

A few hours of painting later and you have one lovely axe.

A note about painting for all you lovely folks out there: Spray on your metallics! It will save you a lot of time. Additionally, when you have multiple overlapping metallics, like I do with this axe, you should always paint a base coat of regular acryllic that's a similar color to your metallic. This will save you a good bit of time and aggravation later, because it'll take fewer top coats of your metallic paint to get it looking good and any spots that you may have missed won't be very noticable.

Anywho, there's Libra's axe! So let's move on to weapon # 2... which is somewhat less of a weapon and somewhat more of a healing tool. It's Brady's staff!

Once again, we started with a foam base, which thankfully they make wreath foam so I already had the base circle! Thank god because it would've not been nearly as properly round. More carving and frosting with putty!

The smaller details are all done with paper clay, as is my standard. Although, since it's all kind of a layered look with the details, they didn't stick very well so I had to glue a lot of them back on when they dried. Alas.

The nice thing with that pole, it's actually a flagpole and therefore it unscrews in the middle!

P.S. That shade of gold is probably my favorite color ever for prop stuff, and it makes me really angry that all of the brands that have this color or something similar have discontinued it. Come on, guys!

Well, now that it's painted, all we have left is the little leathery wrap for the handle and BOOM. Done. This is also where the benefit of having worked at Joann's comes into play because I rotated out the faux leather bias tape that I used for this detail and therefore got to snatch all of it up when it went on clearance! It's the small victories that count :-D

brady-staff

I can't wait to see photos from Acen this weekend with an actual Brady wielding this thing, I'm sure it's going to be awesome.

And to continue with that trend, the last of my trio of weapons (and this one is much more dangerous than the healing staff) was also constructed for Acen this weekend, for the wonderful and talented Mochici Cosplay! This time, I got to make a Brave Sword for Lon'qu, and I'm sure he will wreck some Plegians with it!

This one started with a wood base using a thin craft board. I usually use craft boards for my swords because they're sturdy, fairly lightweight, and the proper thickness for making a sword! Not to mention, I've gotten pretty good with my jigsaw!

The central details on the blade could have easily been done in wood, but cutting out all of the small spaces with a jigsaw was going to be rather difficult, and if I screwed up, it would have been rather difficult to fix. So instead, I decided to use foamcore board (my new favorite prop-making material) as it's a lot easier to cut, and is a lot cheaper to remake things if I mess something up!

After the foamcore part of the blade was glued in, the last bit of construction was using paper clay to build up the hilt of the sword... which of course I'm a dummy and didn't take a picture of that step. So let's just skip ahead to the part where we paint! Remember that important rule: Paint your metallics first!

The last step, much like with the staff, is to add the wrap to the hilt. A little bit of drying time with the glue and it's all ready to go!

And of course, being the good little crafter and FE fan, I naturally had to test out my newly forged sword so it's PLAY TIME!

Needless to say, I am super pleased with how all of these things turned out and I can't wait to see some photos of them with their proper costumes. Perhaps I can manage to post some of those soon.

Thanks again for tuning in, my loves!

Humans are greedy, therefore they are human

Michael MacWolff

Welcome back my darlings! Sorry I've not been updating my blog more than once a week, I always have grand aspirations and then I never manage to find time to make other posts. But I promise to make an effort!

Anywho, I thought I'd take a moment today to talk to you about what may be my favorite anime, and the resulting costumes that came from it. Now you've actually seen these costumes before, but most of you probably have no idea what they are because it's not a very well-known anime. What I'm referring to is Kiddy Grade, which if you've every talked to me about anime, I almost always recommend it for purely selfish reasons, because I want other people to be able to talk to about it!

My discovery of Kiddy Grade was actually quite a while ago. When I was in high school I discovered that our local library had a small anime & manga section and I decided to check it out. Their selection was kinda wierd, and definitely incomplete, which was a little annoying because they'd only have small portions of series/seasons and it didn't always start at the beginning. Nevertheless I ended up watching a good variety of random things and really enjoyed a lot of it. Kiddy Grade was among these various tidbits of anime and it was one of my favorites that I had watched despite not being able to see it in its entirety. The cast of fun characters, the mix of comedy, drama, and action and the premise itself all caught my attention. The only thing that was a little over the top was the hypersexuality toward the beginning. There are 20 or so panty shots in the first episode, which does nothing for me as a gay guy, but if you can get past that then it really is worth a watch. It wasn't until much later that I would actually find the full series on DVD and managed to watch it in full. Admittedly I was impressed; the show, which appears at first to just be a space action series involving agents of the Galactic Organization of Trade and Tariffs with superhero powers turned into a very riveting political drama (still involving GOTT agents with superhero powers).
So, if you're looking for a new anime to check out, I recommend this one. And after you watch it you should come talk to me about it cause that would be delightful!

And that brings us to some Kiddy Grade cosplay!

by-your-side

This is the photo that most of you have probably seen as it's one of my favorites and I've had it set as the header photo on my main page since the creation of mikeydoescosplay.com. This is Armbrust (or Amrblast in the English dub) and Pfeilspitze, also known as Mercredi. This particular shot is actually one of my favorite scenes involving these two that actually takes place in the show.

The fact that this photos exist brings me so much joy because I never thought I'd have someone to cosplay with because no one is aware of this series. Also, I'd never cosplay from this series alone because all of the characters are explicitly partnered (and I don't mean that in any sort of shipping way, I mean they all have partners and it's a significant thing in the show). The only characters I could reasonably do solo would be Chevalier d'Autrice... who is hella obscure even for me, or Chief Eclipse. Now the Chief I would totally do but I can't imagine anyone would ever recognize me, not that I would have a serious problem with that. And she is kind of a bamf, so that may eventually happen, I mean just look at her.

But I digress. The reason this cosplay ultimately came about is because I found myself a partner in my dear friend and wonderful cosplay buddy, Rion. I introduced him to the show quite some time ago by letting him borrow my copy after a convention. To my great delight he loved it and we started scheming what pair the two of us could cosplay together. We shared a mutual love of Armbrust so it didn't take long to come to that conclusion. And thus a lovely new pair of cosplays was born. And I'm super greatful cause he even wore a dress for it, which doesn't happen very often XD

We debuted the costumes at Tekko in Pittsburgh which was the perfect place for it because the roof of the David L. Lawrence Convention Center looks like it could be a spaceport. Not a single person recognized the two of us, although a delightful young man dressed as 21 from Venture Brothers asked "Is Adam in there?" Which it took me about 5 minutes of staring at him with a confused look on my face to figure out that it was an Evangelion reference and he thought I was Ryoji Kaji. Which was actually a pretty reasonable thought though my case was way too big for that. Anyway, it didn't matter because we were cosplaying for each other and got some fantastic photos in the city. We also had lots of entertainment with me trying to pronounce Pfeilspitze's name and thus was born Pfgermanname.

Aaaaaand, let's just not talk about that wig. We all know it has issues.

Aaaaaand, let's just not talk about that wig. We all know it has issues.

pfeilspitze-solo
partners
waiting

The costume itself was actually pretty nice to wear. I made the suit jacket myself as the prospect of finding a double-breasted suit in the color I needed proved too much to accomplish. Unfortunately I did something wierd with the sleeves and they ended up fitting kinda awkwardly but it wasn't all that noticeable unless I was lifting my arms up (hence why it's not happening in any of these photos). Having that case was also awesome because the front actually lifts up the way it does in the show and there was a little shelf inside I could store things on. It was quite useful for keeping my wallet, any nerd swag I picked up, and some cookies for when we needed a snack. Unfortunately I don't have a photo with it open after it was finished, but here's what it looked like in progress.

case-in-progress

Of course our lovely photoshoot had plenty of goofy pictures too, so why not share them as well?

That last one is actually based on official artwork they used on the transition animation before and after the commercial breaks.

And there you have it. Unfortunately, as much as I love Armbrust, it is unlikely that he'll be worn again for quite some time as my occasions to see my dear Pfeilspitze are becoming infrequent and we have lots of other cosplay pairs we're trying to do. But that just means you lovely people should all go watch Kiddy Grade and we can plan some more awesome cosplay pairs together!